
Short answer: on a vehicle with a factory immobiliser, an aftermarket push button start kit does not create the signal that allows the engine to run. It only takes over the mechanical act of turning the key. The permission to start still comes from the factory immobiliser, and that immobiliser only recognises the original transponder chip. If the chip is not near its reader coil when you press the button, the engine will crank and refuse to fire — or fire and die a second later.
Does this apply to every car? No — and this is the first thing to settle before you open the steering column. If the vehicle never had a factory immobiliser, there is no chip to worry about. See §3.1 for the vehicle groups.
What the Kit Actually Controls
Three things, and only three
A push button start module sits between the driver and the ignition switch. On a conventional key-start vehicle it does exactly three jobs:
- It switches the ignition circuits — ACC, ON and START — in the same order a key would.
- It energises the starter relay for as long as the button is held (or for a programmed crank window).
- It reports state through the button LED, so the driver knows whether the vehicle is in ACC, ON, or armed.
That is the whole list. It does not adjust fuelling. It does not adjust ignition timing. It does not talk to the immobiliser.
What still decides whether the engine runs
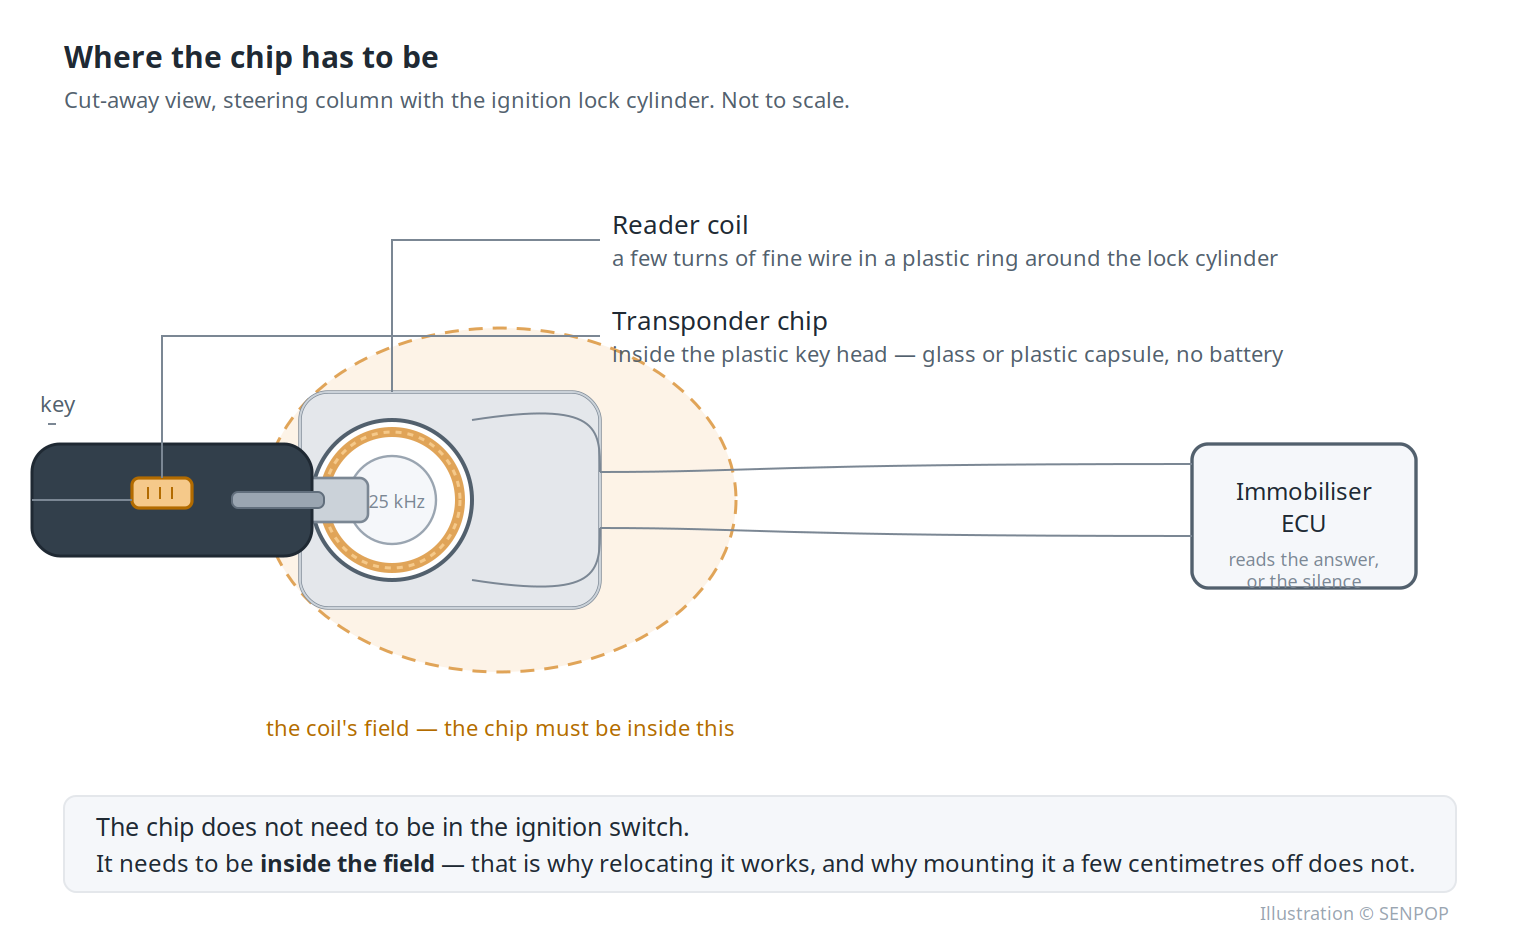
On any vehicle built with a factory immobiliser, the engine control unit runs a separate check before it allows fuel and spark. A coil around the key cylinder radiates a low-frequency field. A small transponder chip inside the key head draws power from that field and answers with its stored code. If the answer matches, the ECU releases the engine. If there is no answer, or the wrong one, the engine will crank on the starter and never fire.
This handshake happens whether you turned a key or pressed a button. The button is irrelevant to it.
Two symptoms, one cause
Installers describe two different failures. They usually have the same root.
| What the driver reports | First suspect | 30-second check |
|---|---|---|
| Button lights up, one click from the engine bay, engine never turns over | Starter circuit or immobiliser refusal | Does the starter relay click? If yes, the module is working and the ECU is refusing |
| Engine cranks normally, catches, then dies after one or two seconds | Immobiliser refusal after initial start | Watch the security light on the cluster — if it stays on or flashes after the engine dies, the ECU never accepted the chip |
| Engine cranks, never catches, no security light | Fuel or ignition circuit, not immobiliser | Check for a disconnected ignition connector behind the lock cylinder |
| Button does nothing at all, no LED | Module power or ground | Check the module fuse before anything else |
The first two rows are the ones this article is about. Note that they look different to the driver and identical to the immobiliser: in both cases the ECU saw no acceptable answer, and in both cases the fix is in the chip's position, not in the button.
How the Factory Immobiliser Handshake Works
The antenna coil
Around the ignition lock cylinder there is a plastic ring with a few turns of wire inside it. That ring is the immobiliser antenna. It is powered by the immobiliser ECU and it produces a short-range electromagnetic field — strong enough to reach a chip sitting inside a key head inserted into the cylinder, and not much further.
The diagram at the top of this article shows the arrangement: lock cylinder, coil ring, key head with the chip inside it, and the ECU on its two-wire lead.
This is the single most important physical fact in the article: the chip does not need to be in the ignition switch, it needs to be inside the field. That is why relocating it works at all.
The transponder chip
The chip is a small encapsulated body — often a few millimetres across, sometimes a short glass or plastic capsule — embedded in the plastic head of the key, not in the remote fob's battery compartment. It has no battery of its own. It is powered by the field from the coil and it answers by modulating that field.
Two practical consequences follow, and both matter on the bench:
- The chip cannot go flat. A dead remote battery does not disable the immobiliser answer. This is why a vehicle can still start with a key whose remote buttons no longer work.
- The chip has no contacts. There is nothing to solder and nothing to clean. It either sits inside the field or it does not.
The ECU decision
The immobiliser ECU compares the answer against what is stored for that vehicle. Match means the engine is released. No match, or silence, means fuel and spark stay locked.
On some vehicles this check runs once, at the moment of cranking, and then latches. On others it is re-checked continuously while the engine runs. This difference is one reason two vehicles with what looks like the same fault behave differently — one refuses to crank at all, the other starts and then dies. We have not verified the check timing per model, and we would not publish a per-model claim without the data.
Why this is good news, not bad
An installer's first reaction to all of this is usually that the immobiliser is an obstacle. It is the opposite.
Because the immobiliser is a separate system with its own reader and its own chip, a push button kit can borrow it without understanding it. You do not need to defeat the immobiliser. You need to keep the chip inside the field, permanently, and then the button and the ECU will agree with each other on every start.
That is the whole trick. Everything that follows is execution.
Related: the handshake above is the immobiliser layer. If you also want to understand how a passive keyless entry system decides that the key is near the car, that is a different mechanism with a different range — see how PKE keyless entry works.
First, Decide Whether You Touch the Chip at All
Do you even need to touch the chip?
Before any of the three methods below, settle one question: does this vehicle have a factory immobiliser?
A push button start kit is an add-on. It brings its own start logic and, on models like our 9002, its own hidden immobiliser function. It does not remove anything the vehicle already has. So the work is different depending on what the vehicle started with.
| The vehicle as it arrives | Chip work needed? | What the kit adds |
|---|---|---|
| No remote, no factory immobiliser — typical panel vans and small A0-class cars | None. There is no chip to relocate | Push button start and stop, hidden immobiliser, brake-light flash, brake alarm |
| Factory transponder immobiliser | Yes. The chip has to stay inside its reader's field | Same, plus the relocation described in this article |
| Already has an aftermarket alarm (Steelmate-type, PLC-type, or a plain alarm) | None for the original chip. The aftermarket alarm is a separate system and is not tied to the factory chip | Same, plus the hidden immobiliser layer protects the vehicle in addition to the existing alarm |
| Already has a PKE keyless entry system | None for the original chip | Same, and the two systems work alongside each other — see how PKE keyless entry works |
This table comes from the 9002 supplier's own installation documentation, which states the three usage conditions explicitly. It is not our inference.
The practical consequence: if the car has no factory immobiliser, the rest of this article does not apply to it, and skipping the chip steps is correct, not a shortcut. Most of the no-start complaints we see in that group trace back to something else entirely — a disconnected ignition connector, a module fed from an ACC line, or a bad ground.
The unplugging note that actually causes comebacks
The 9002 documentation carries a note that appears under all three usage conditions, and it is easy to skim past. It concerns what happens when you leave the original key in the lock cylinder to release the steering lock.
| What you want | Ignition connector behind the original lock cylinder | Original key in the lock cylinder |
|---|---|---|
| Use only the button to start; use the key only to turn to ACC and release the steering lock | Unplug it | Yes, in ACC |
| Keep both the original key start and the button start working | Leave it plugged in | Do not insert the key |
Both rows are valid. What is not valid is mixing them — leaving the connector plugged in and leaving the key sitting in ACC. That combination is the one that comes back.
The mechanism is straightforward: in ACC the ignition circuit is live and the accessories on it — the audio head unit above all — draw current continuously. A car in that state is not "switched off", it is idling at a few hundred milliamps indefinitely. Over one to three weeks of normal use the battery goes flat, and the customer reports "your kit drains my battery". The kit is not at fault; the state it was left in is.
Why the second row exists at all: some customers want to keep using the original key as a fallback. That is fine, and it does not conflict with the button — but then the key must not be left in the cylinder, because an inserted key is what puts the circuit into ACC in the first place.
The two-row rule and the audio-drain reason are stated in the 9002 supplier installation documentation; the failure progression above is our explanation of what that stated reason leads to in the field.
Two practical consequences for the bench:
- Decide this before you close the panel, and tell the customer which of the two configurations they have. A customer who does not know will revert to the wrong one the first time the steering lock bothers them.
- It is five seconds of work and a two-week-later phone call if you skip it. This is the cheapest comeback in the whole installation to prevent.
Related: the note above is also summarised on the 9002 product page. This article explains why the choice matters; the product page states the two options. If you only read one, read this one — the product page states the rule, not the cost of getting it wrong.
Three Ways Installers Keep the Chip in the Field
Everything in this section applies only to the "factory transponder immobiliser" row of the table above. There are three approaches in common use. They are not equally reversible, and the difference matters more than the cost difference.
Method 1 — Keep the original key head inside the coil
The key head containing the chip is fixed permanently inside or against the reader coil, and the assembly is tucked behind the steering column cover.
- Reversible: yes. Nothing is cut, nothing is removed from the key.
- What you keep: the original key still works mechanically if it is ever needed.
- What you lose: the key head now lives inside the dashboard. The vehicle's remote buttons will still work while the fob battery lasts, but the physical key is no longer in the owner's pocket.
- Best for: vehicles where the key head is large enough to be mounted without strain, and customers who want the option to revert.
This is the method our own 9002 documentation describes: the chip and the lock cylinder's sensing ring are taped together with cloth tape, then the combined assembly is secured inside the dashboard with cable ties. The alternative given in the same document is to attach the chip directly to the sensing ring at the original lock cylinder position.
Method 2 — Remove the chip and mount it on the reader
The chip is extracted from the key head and fixed directly onto the reader coil.
- Reversible: no. Once the key head is opened and the chip is out, putting it back is not a bench job.
- What you gain: a much smaller assembly, which is easier to hide and less likely to be disturbed by a knee panel or an air duct.
- What you risk: if the chip is cracked during extraction, the vehicle will not start at all until a new chip is registered — which depending on the vehicle and the key system means a dealer visit or a locksmith with the right equipment. This is the one step in the whole installation where a small mistake has a large, immediate cost.
- Best for: tight spaces, and installers who have done this specific key type before.
Method 3 — A dedicated bypass or interface module
Some vehicles do not accept the simple relocation approach. In those cases the correct part is not a chip in a coil but a bypass or interface module that emulates the immobiliser answer to the ECU.
This is not universal, and it is not something to improvise. Our S-807R product page states the position plainly: "vehicles with factory immobilisers may need an extra bypass module." The same page also notes that some vehicles need an additional CAN-bus module that is not part of the kit.
If a vehicle falls into this group, the honest answer to the customer is that the kit alone is not sufficient and a module has to be quoted in.
Which method applies to which vehicle
| Method | Works when | Reversible | Main risk | Typical bench time |
|---|---|---|---|---|
| Keep the key head in the coil | Vehicle has a factory transponder immobiliser; key head can be mounted without strain; chip is a separate body inside the head | Yes | Assembly works loose, or is mounted outside the field | Short |
| Remove the chip | Space is tight; installer knows the key type | No | Chip damaged during extraction → vehicle immobilised | Short, but unforgiving |
| Bypass / interface module | Vehicle will not accept relocation, or ECU expects a data answer | Yes (module can be removed) | Wrong module for the vehicle; extra cost not quoted | Longer, and needs the right part on hand |
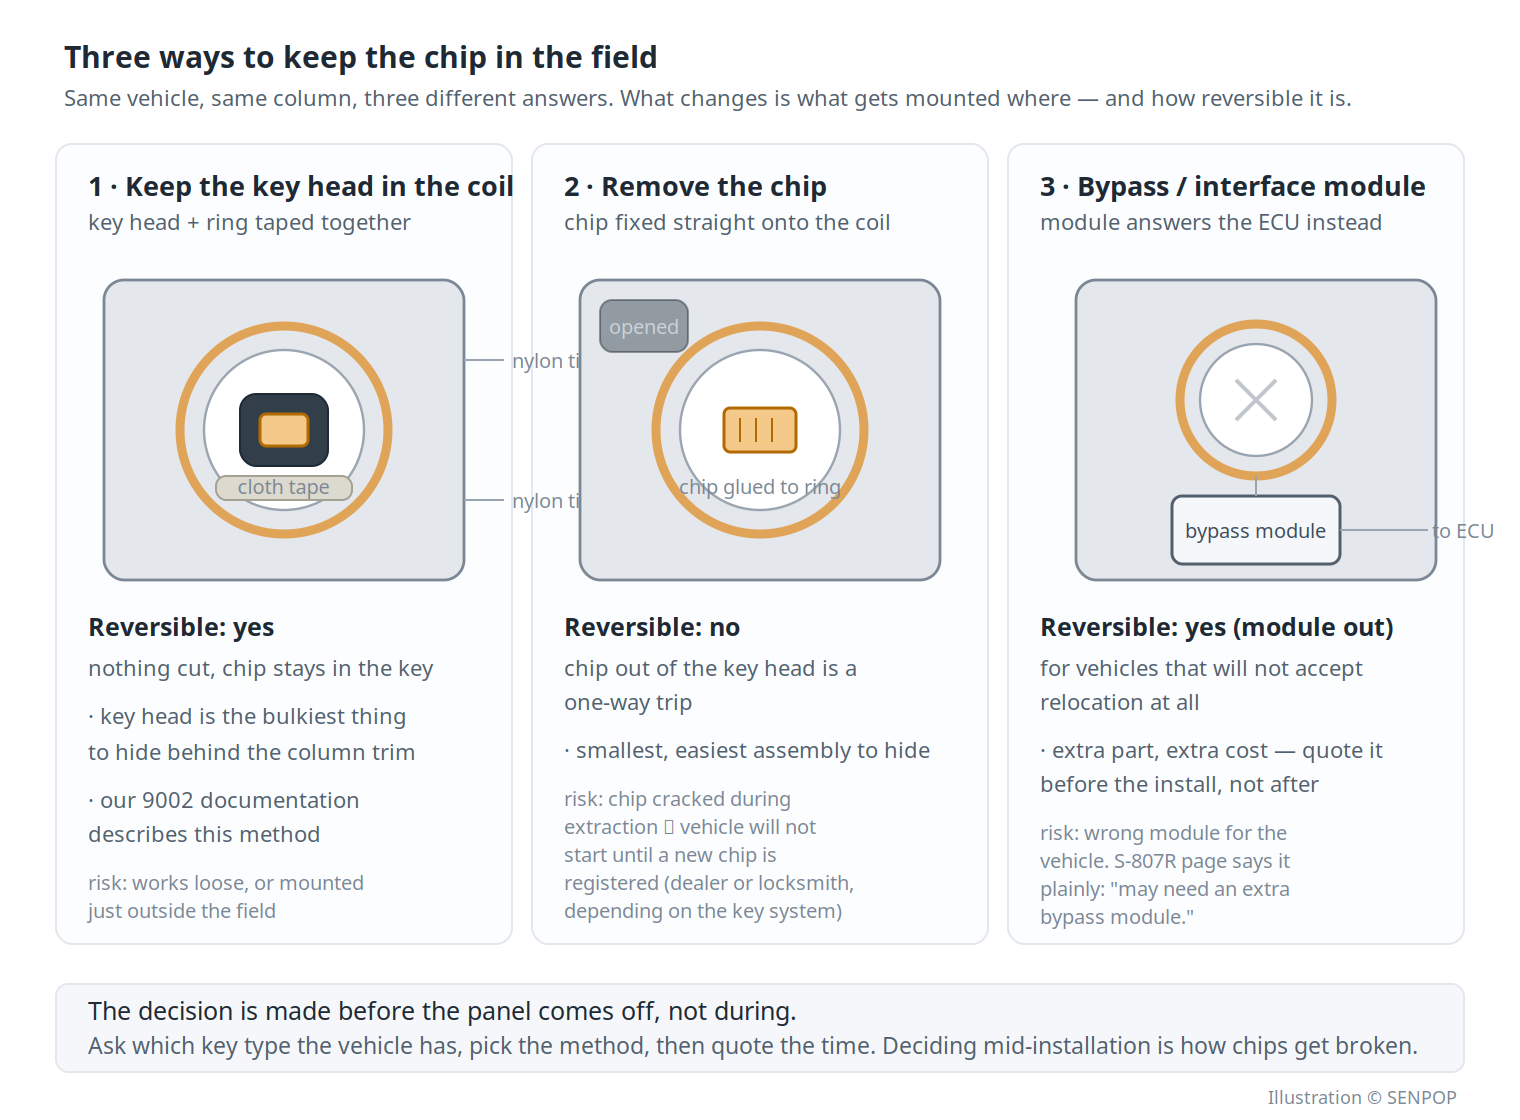
Illustration © SENPOP, based on the supplier's installation documentation.
The decision is made before you open the panel, not during. Ask which key type the vehicle has, then pick the method, then quote the time. Deciding mid-installation is how chips get broken.
The Three Conditions, and the Failures They Prevent
Keeping the chip "in the field" is the goal. In practice it fails in three specific ways.
Condition one: close enough to the coil
The field falls off quickly with distance. The chip has to sit close enough that the coil can still power it — usually within a couple of centimetres, and the exact working gap varies with coil design and chip type. Treat it as "as close as the assembly physically allows", not as a number to quote. Verify on the actual vehicle; the same kit can behave differently on two models.
Do not confuse this with 12 cm. The 12 cm figure that appears on our 9002 page is the ID card reading distance for the hidden immobiliser function — a completely different reader. Mixing the two numbers up is one of the most common documentation errors in this product category, and it leads installers to mount chips far too loosely.
The common mistake is mounting the assembly on the outside of the trim panel with a cable tie, where it looks secure and is several centimetres too far away.
Condition two: continuous power during cranking
The reader coil has to be energised at the moment the engine cranks. If the module that feeds it loses power during cranking, the chip is briefly unreadable and the ECU sees silence.
The supplier's manual for this product family lists this exact failure — car cranks but does not start after installation — as its first troubleshooting entry, with the cause given as the ECU losing power during cranking and the remedy being a relay that keeps the ignition circuit powered through the crank event.
This is one manual's account of one failure mode on one product family — a condition to check, not a law that applies to every vehicle.
The practical rule that survives regardless: the module's main power should come from a constant feed with its own fuse, not from an ACC line that drops out when the starter engages.
Condition three: not shielded by metal
A transponder chip behind a steel bracket is a chip in a Faraday cage. The field does not reach it and the answer does not come back.
This is easy to do by accident:
- Cable-tying the assembly to the steering column tube.
- Mounting it against a metal dashboard substructure.
- Using a metal clamp or a metal tie to hold the coil.
Plastic, cloth tape and nylon ties are fine. Anything ferrous is not.
A 30-second test before you close the panel
- Refit the trim panel loosely — do not fasten it.
- Press the button and start the engine.
- If it starts, switch off, fasten the panel properly, and start again.
- If it does not start with the panel in place but did without it, the assembly is being pushed out of the field or into contact with metal by the panel itself.
This one step catches the majority of comebacks, and it costs half a minute.
| Condition | Symptom when violated | Cost of finding out later |
|---|---|---|
| Too far from the coil | Intermittent no-start, worse in cold or damp | Full return visit; the customer has already lost confidence |
| Power lost during crank | Cranks but never fires, every time | Return visit, plus a rewiring job |
| Shielded by metal | Never reads, regardless of distance | Return visit, plus panel removal again |
Frequently Asked Questions
Can I use a cloned chip instead of the original?
Cloning is a locksmith function, not an installation shortcut, and whether it is possible depends entirely on the chip generation. It is not something to plan an installation around.
My car has a smart key with no mechanical blade. Does this still apply?
The principle is the same — the vehicle still needs its credential inside the reader's field — but the implementation is different and often needs a bypass module rather than a relocated chip. This is a case to confirm with us before quoting, not to improvise on site.
The button lights up but nothing happens. Is it the chip?
Not necessarily. Check the module fuse and ground first, then whether the starter relay clicks. If the relay clicks and the engine does not turn, then the immobiliser is a strong suspect.
How long does this step take on a typical sedan?
The relocation itself is quick; the time is in removing and refitting trim. Quoting a single number across models would be misleading, so we will not.
Do all SENPOP kits require keeping the original chip?
No — and it depends on the vehicle before it depends on the kit. If the vehicle has no factory immobiliser, there is no chip to keep. If it does, the chip has to stay inside its reader's field, either relocated or handled by a bypass module. Our S-807R page notes that vehicles with factory immobilisers may need an extra bypass module; the 9002 documentation describes chip relocation with the sensing ring. §3.1 above has the vehicle groups.
My van has no remote and no alarm. Do I need any of this?
No. On a vehicle with no factory immobiliser there is no chip to relocate, and the kit's start-stop, hidden immobiliser and brake functions work without it. Skip the relocation methods entirely — but do not skip the unplugging note in §3.2, which applies to every vehicle.
Tell us the vehicle, and we will tell you which case you are in
Send us the make, model and year and we will tell you which group the vehicle falls into — no factory immobiliser, factory immobiliser, or already carrying an aftermarket alarm — and therefore whether any chip work is needed at all, whether the chip can be removed from the key head or has to stay in it, and whether the vehicle needs a bypass module on top of the kit.
That is a better first message than "what is your price", because it is the question that decides whether the installation works.
Ask about a specific vehicleRelated Reading
- 9002 Push Button Start Installation Guide: Wiring, Setup and Troubleshooting — the full 9002 procedure, including the chip relocation steps and the 6P start-function wires
- How PKE Keyless Entry Works — the authorisation chain and range, which is a different mechanism from the immobiliser described above
- 9002 Push Button Start + Hidden RFID Immobiliser — the product this article's installation steps come from